DIY: Word Wall Art
My whole house is in need of an honest-to-goodness revamp. There are pictures from almost 9 years ago, when I bought my house, still hanging. That’s almost a decade of the same look.

Plus, buying a house is expensive. The things I got to fill my home were hardly the nicest and sometimes I didn’t even like them much. If I found anything that matched the rest of my stuff with a low, low price tag, it joined the décor collective.
Around the house, I’ve done a lot of the big things. Every room has been painted to colors I like and in some, I’ve even repainted them again. The floor has been changed from white carpet to easy to clean wood laminate. I’ve scraped away every last pop of popcorn on my ceilings and re-textured them. It has been so much work but total labor of love.
DIY: Word Wall Art
My fireplace, however, was an absolutely awful orange brick with gray mortar eyesore. No amount of work done in the living room changed the fact that the hearth was UGLY. Even though I had more people tell me it was a bad idea than good, I painted that sucker white. My sweet dad even installed a sleek and modern white mantle.
So, when I was looking around my living room and admiring how nice my fireplace looks, my eye naturally wandered to the picture hanging there. It was a long, skinny photo collage type of thing. There was nothing wrong with it, but I was tired of that same old look. I decided new hearth, new art!
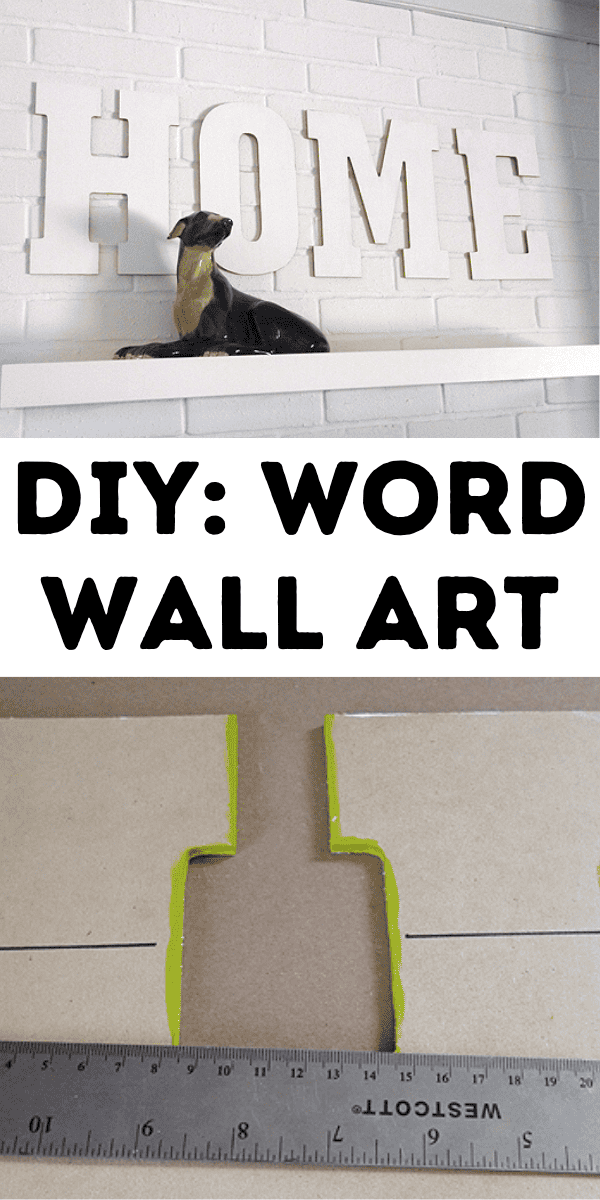
I wanted art that had a more contemporary look with an emphasis on differences in texture, not color. I decided to go with oversized letter art. The project was so exciting mostly because I knew that I could spell anything! HOME. HOPE. LOVE. LIVE. The options are only as narrow as the space I had to hang it! In the end, I went with HOME, but you can spell SLEEP over a bed, HOWDY on your front porch, COOK behind your stove. It’s so easy and inexpensive that every wall in your house can have a voice!
So, want to make your own custom word art for your home? Let’s get started…

For the art itself you will need:
- Ready to decorate wood letters
 , available at hobby stores (mine are 13 inches tall and about 9 inches wide)
 - Acrylic paint
- Cheap foam paintbrush
- Ruler
- Saw-tooth picture hangers
- Strong adhesive (I used E-6000)
 , available at hobby stores (mine are 13 inches tall and about 9 inches wide)


 (I used
  )
)Optional materials needed to hang your letters:


Step 1: Remove any stickers or price tags and paint your letters. You can go solid, use a crackle finish, or do anything your heart desires! I painted the bulk of mine white and the edges a similar green as the walls on either side of my fireplace. Use as many coats as needed to achieve your desired effect. Allow drying completely.

Step 2: Lots of letters, like my “H” need two hangers placed on the back so that they hang correctly. I also don’t want to constantly adjust them with every shimmy and earthquake the Oklahoma fault lines try to throw at them. Turn your letters over and use a ruler to draw a straight line across. This will help so much with the next step…

Step 3: Using your strong adhesive, attach your saw-tooth hangers. Use the lines you drew as a guide for straight placement. I placed the bottom of each hanger alongside the top of each line for uniformity.
~~~~~~~~~~~~~~~~~~~~~~~~~~~~~~~~~~~~
To hang your letters:

Step 4: Roll out your wax paper. Measure out the length of the area you will hang your letters. Place your letters on top and situate them just as you want them to sit on your wall. Trace each letter with your magic marker, taking care not to mark up the paint. If your letters are taller than the wax paper, don’t worry about it. Just situate so that you have about an inch at the top and let the bottoms hang off as I did.

Step 5: Flip over your wax paper so that your word reads backward. Place each letter underneath the paper face down so that you can see your hangers through the wax paper. Draw a dot where a nail would be conveniently placed. Repeat for all letters.

Step 6: Using your masking tape, attach your wax paper just as you want your letters to sit on the wall. Step back and make sure you like the placement and that your letters appear straight. Adjust as necessary until you are happy with the placement.
Place your nails or other hanging implements on the dots of your wax paper and drive through to the wall. When all of your nails are attached, tear your wax paper down. Hang your letters and enjoy!

**Note: Rent and can’t drive nails or screws into your walls? Don’t want to permanently mar your brick or concrete? Follow the steps above, but substitute wall hangers for sticky Velcro tabs. These are purchasable in the hardware section of big box stores and in some hobby stores. The adhesive is strong enough to keep your letters in place, but won’t destroy surfaces when it is time to come down!
A crafter since her earliest years, Allison spends a little time every day making something. She crafts, sews, paints, glues things onto other things, and is a firm believer that a life spent creating is a life worth living. Visit Allison’s blog, Dream {a Little} BIGGER.
One Comment on “DIY: Word Wall Art”
I may be able to handle this project! So smart!