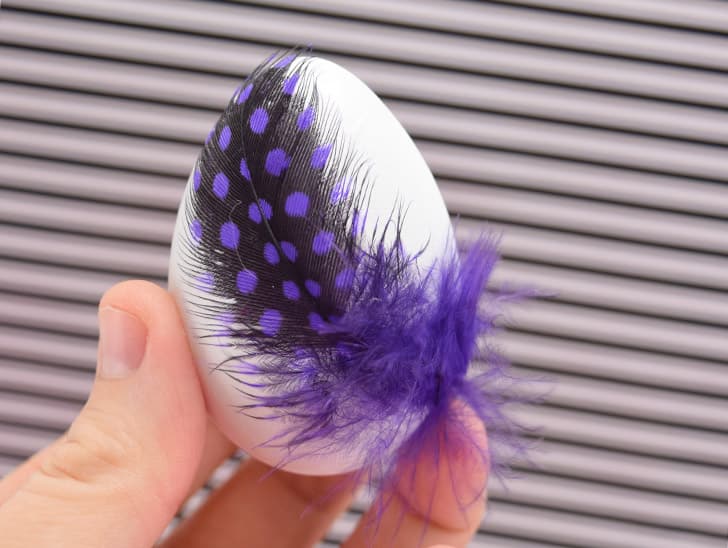
No-Dye Feather Easter Egg Decoration
Learn how to decorate unique Easter eggs using brightly colored feathers, Mod Podge, and hot glue – no dying needed!
Sometimes, project ideas don’t turn out as I had hoped. When spit-balling Easter ideas for Amy, I mentioned this concept with the disclaimer that it might look better in my head than in real life.

Creative No-Dye Egg Decorations
In truth, my first attempt was okay, but I figured it was one and done, you know, the first pancake. But that’s not how it went down at all. In the end, I think you can see that it turned out pretty well.

I tend to apply heavy coats of paint when decorating Easter eggs, so I wanted less without feeling underdone. These colorful feathers, which I found at the craft store, have sat in my stash for quite some time.
When I saw their bright, fun colors, I realized I wanted to put them on some simple, white eggs.

I hope you’ll agree that while not overly done, these no-dye Easter eggs are quite pretty in their simplicity. Do you want to make some?
The process is hardly complicated, but I wasted quite a few feathers getting it right. Gather your materials, and I’ll show you what I mean…

Supplies Needed for Feather Easter Egg Decorations

How to Make No-Dye Easter Egg Decorations
So these are the eggs that I am obsessed with decorating every Easter. They are plastic and dyeable eggs you can purchase for $2 a dozen at Walmart. I like their permanence, so I can keep my creations for a long time.
You can also blow the insides from real bird eggs, but the shell will be brittle once dry. This makes for a fantastic keepsake, but I want something less likely to be wrecked instantaneously by children or pets for decor around the house.

These little guinea feathers are dyed in many pretty and bright colors. However, this dye will bleed into a wet Mod Podge, so we must work quickly.

If you will, my first attempt turned out okay, but it looked spikey—not quite what I had hoped for.

Then, attempt two was just like when my mascara got all clumped up. If I keep swiping that brush across it, I can fix it, but I only make it clump up even more. Gah. Ew. It’s terrible.

We want something more like this. To achieve this, the top spotted portion of the feather is Mod-Podged onto the egg.
This can get clumped up, so to avoid that, apply a small amount of Mod-Podge to the egg where this top, dotted portion of the feather will meet with it. You might have to place the adhesive on the egg, eyeball where to put it, and then get after it.

Place only the top of the feather straight down onto the wet glue. Don’t use the brush to fan the feather out or push it around.
These things will gnarl up that top portion of the feather quickly, making it unusable. Leave the fuzzy part out of the Mod Podge; we’ll attach it in just a second.

Decoupage as many feathers onto your eggs as you wish and give them plenty of time to dry. I waited about an hour, and that’s all the more time I needed. FYI, I also tried multiple feathers onto one egg, and it just got too busy for me, but feel free to play around with quantity and placement.

To finish the egg, apply a tiny amount of hot glue to the end of the feather. The stiff quill works super well, I guess. It takes a small amount of hot glue to keep it secure.
I used the lower-heat glue option since the glue can quickly come up around that quill part or through the feathers.

A chopstick or skewer works well to hold the feather if you tend to burn yourself with hot glue. Hot glue doesn’t stick well to metal, so a crochet hook, spoon, or similar object can also work well.

I was happiest with the finished result with the medium-sized feathers from my package. The smaller ones were too small—however, my package’s most prominent feathers made for some interesting eggs.

I used larger feathers on this purple guy, with the fuzzy bottom piece wrapped around the back of the egg. It came out well, but I only had two or three decent feathers of this size. If I had more, I probably would have done them all this way!

Cheerful, colorful, happy, and slightly bohemian no-dye Easter eggs! I think they are perfect. 🥚


3 Comments on “No-Dye Feather Easter Egg Decoration”
Pingback: Diseño de huevos de Pascua: la guía definitiva – Señora trabajadora
Pingback: Conception d’œufs de Pâques : le guide ultime – magasin d'artisanat
Pingback: Osterei-Design: Der ultimative Leitfaden – Meine Lieblingsjobs