Organize Your Closet… For Good!
If opening your closet makes you want to cringe a little because you know all too well the mess that’s waiting for you just behind those doors, then you’re in the right place. I know all too well that frustrating feeling of not knowing where anything is, not being able to find your LBD when you need it, faced with a scrambled of wrinkled clothing, disorganized, unfolded, and completely chaotic — which is the last thing you need in your life when you’re trying to get out the door in a hurry for work or school or a night out with your BFFs!
Today, my goal is to give you the tools that’ll turn your closet from a horrific mess to a sanctuary dedicated to the clothing you actually wear, love, and enjoy. We’re going to get rid of the clutter, find new ways to store your favorite items, and by the end of if you’ll no longer dread opening those doors — you might even enjoy it!
Let’s do it!
Step 1: Empty It
First things first — you’ve got to empty your closet. If you have a walk-in closet, feel free to do this section by section, but with anything smaller, just take it ALL out, dump it on your bed, and take a deep breath. I find dumping your stuff on your bed means you HAVE to deal with it that day, or else you’re sleeping in a tangle of denim and dresses, so if you can start this project early in the day, go for it! 🙂 Also, give your closet a little cleaning while it’s all empty and naked. Grab your cleaning wipes or whatever you like to use and swipe all surfaces to get rid of dust bunnies and whatever else is hiding inside. Now you’re ready!
Step 2: Get 3 Baskets
You can use laundry baskets, big cardboard boxes, Rubbermaid totes — whatever you like. One is for items to THROW OUT, one is for items you’ll DONATE, and one is for items you’re going to KEEP. Label them with a sticky note and line them up on the floor.
Step 3: Sort It Out
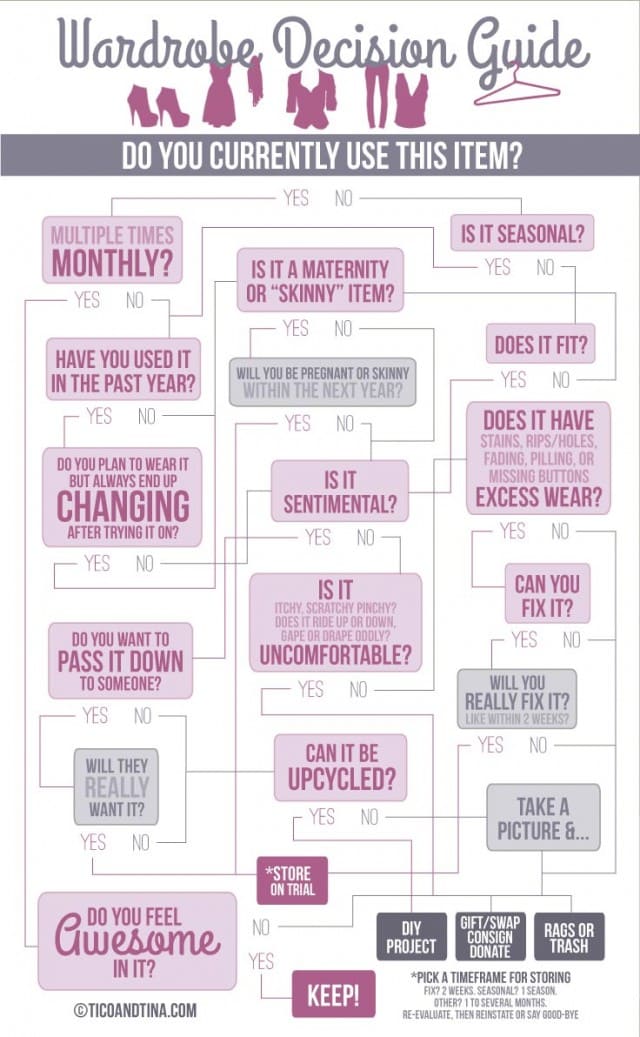
One by one, you’re going to take all of the items that were in your closet, and figure out which basket or box they belong in. This might seem simple, but you’re going to get stuck on a few things and the chart below might be helpful so you can talk it out! For instance, if you’ve been hanging on to a pair of jeans that will fit when you lose 10lbs, just say goodbye to them. Don’t torture yourself. I’ve been guilty of this too and I can tell you you’ll feel 110% HAPPIER when those “skinny jeans” aren’t staring you in the face! The same goes for clothing that’s too big, out of style, or that you’ve never actually worn by “might someday”. Live in the NOW, my friends! You’ll thank yourself! 🙂
Step 4: Divide And Conquer
Once everything has been sorted (add extra boxes to each of the three categories if you need more space during your sorting!) you’re going to TAKE ACTION! That donate box? Go put it in your car — right now! The throwaway box? Head to your garbage bin and say adios! (Now, I hate throwing clothing in the garbage, but this pile will mostly be filled with things like holey undies, clothing that can’t be repaired, and other items that aren’t fit for donation.) The box filled with items you’re going to keep is ready to head back into the closet… but first…
Step 5: Get Some Organizational Tools
You don’t have to spend a fortune here, but we’re going to talk about a few things that can help you organize your closet for the last time so that you’ll never have to do this again! You want your closet to be a) beautiful, b) functional, and c) clean.
For hangers, I’m all about the velvet hangers so that your items don’t fall off, especially anything with a wide neck or slippery straps. They save space and your closet will look amazing when everything’s hanging on the same sort of hanger.
Tips from the pros:
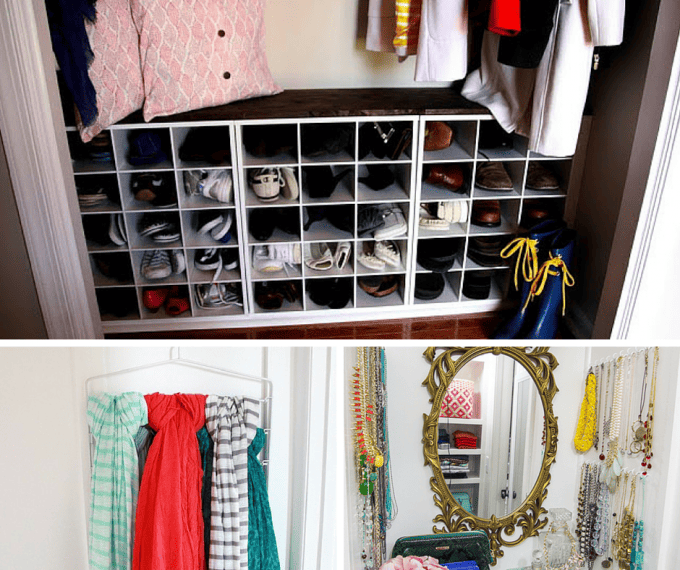
- Install shelving below for your beloved shoes!
- Use a pant hanger to organize your scarf collection!
- Add simple hooks to hang your necklaces and never have to untangle them again!
For accessories and jewelry, find some boxes or containers that are easy to open and maybe ones that stack or fit together to save even more space. I love clean containers so that you can see exactly what’s inside without digging around. Hang belt and scarves, have a space just for jewelry, line your shoes or hang them on the back of the door in a shoe caddy. If you have drawers in your closet, use one to organize your undies! Just be sure everything has space so you’re never wondering where to put something — everything has a home!
Step 6: Refill Your Closet With Care
Take your time and make sure everything has a lovely place to go when you put it back. Hang like colors together, or feel free to section your closet into tops, bottoms, dresses, etc. This is going to make it all so much easier the next time you’re ready to plan an outfit — or even a week of outfits — because you’ll be able to see at a glance what you have, without weeding through all of the clothing you don’t really wear!
Step 7: Stick To It
The next time you get undressed, be sure your clothing goes one of two places: BACK in the closet where you got it, or right into your laundry hamper. Not on the back of the bathroom door, or over the arm of a chair, or on your bed, or (gasp!) on the floor! Again, you’re going to save yourself so many headaches AND your house will be tidier! Win-win!
Feel free to leave yourself a pretty note somewhere to remind you! Or even a little sticky note! Eventually, it’ll become a habit and you’ll be so in love with your newly organized closet space, you’ll never want to part with it!
Bonus Step: CELEBRATE!
Have a glass of wine, watch your favorite movie, buy some fresh cut flowers, or treat yourself to a shopping trip — after all, you might just have room in your closet now for ONE new item you LOVE! 😉
I hope this helps you to find some sanity in your daily life, my friends! Having a clean closet is like having a clean basement or a garage — no one really sees it day-to-day, but you KNOW about it and that mental anguish takes its toll. Now you can breathe easy knowing your closet is fit for a Queen. The Queen of your home sweet home!
Have fun and get organizing! You can do it!
Désirée is the Canuck mama behind So Fawned Lifestyle. Blogger, social media wrangler, go-to girl. Living the life with her partner Rich and awesome daughter Gretchen, she spends her days typing and drinking copious amounts of tea, and watching Gilmore Girl reruns.


